Wednesday, March 31, 2010

China Glaze Classics

It's about time I did a bit more swatching, isn't it? And I have the perfect opportunity, thanks to China Glaze!
Recently, China Glaze was kind enough to send me these three polishes for review.
China Glaze Exceptionally Gifted. Classic pink pearl. 3 coats, no topcoat. This is the perfect classic, bubblegum pink - the exact shade of Hubba Bubba, IIRC. It's very cute, feminine and delicate, for girly-girls. ☺ It has the standard pearl brushstrokes, though, and is a little too sheer for my preference. All pictures are color-accurate, depending on the light you're in, so there's some depth and character to this polish. Pretty!
China Glaze Conga To My Cabana. 3 coats, no topcoat. Bright coral shimmer. This one surprised me - in the bottle, it's kinda blah (to me), but on - it's gorgeous! The color is deep and saturated, bordering on neon. I can't wait to wear this on my toes this summer. I would call it a candy guava color. Again, it's a little too sheer, but it lacks the pearly brushstrokes of EG, thankfully.
China Glaze Outta Bounds. 2 coats, no topcoat. Emerald green shimmer. This is a kissing-cousin to teal. It is definitely on the blue side, and more cool-toned than most greens. It's a great color, and won't ever look swampy like so many yellow-based greens can. It reminds me of a blue spruce or pine color, but richer.
What stood out for me on all three is how glossy they are - I had trouble photographing them, with all the glare. Wow! Opacity was only good on OB, though. The other two, even at three coats showed no sign of being opaque - so nude base color, here I come! No application issues, they all applied nicely. Not too thick or thin, just right. I just wish for wider brushes, as usual.
Bottom line: Would I have picked these out for myself? Probably not - they just didn't stand out to me. (After all, they're not holo, duochrome or flakies! LOL.) Am I glad I own them now? Definitely - they're all solid, beautiful colors that everyone should have represented in their stash, with great application besides. I'm very happy with them.

*Disclosure: This polish was sent to me by China Glaze for review purposes.

Wednesday, March 24, 2010

Stamping Plate Stash

I finally got around to photographing and editing my stamping plates, so I thought I would post them all at once! I crammed them all together, so there are only 4 photos to load. Enjoy!
This is my Essence plate set that I bought from Ulta. This is set 02 Have Fun! I'm not absolutely sure, but I think there may be different sets/plates available.
These are my fauxnad plates that I got from an eBay seller, e.metro. I just noticed they no longer have any items for sale, but I got these last November, and they must have sold out since. Anyway, I like them, and there are many images that I have used already. They're not super high quality, as there were scratches and blemishes on almost every plate, but that hasn't affected the stamping yet. I had no problems with the seller either, they were very accommodating, and sent the plates I requested, within the timeframe they quoted. Also, for what it's worth, there was a stamper and plastic scraper included with this set. I prefer the plastic scraper, because the Essence scraper is metal, and the plates were getting scratched with every pass. Free Blinkies
Last, but not least, here are my official Konad plates. I got these at OC Nail Art, at the end of the coupon codes happy times. Free Emoticons I just wish I could have gotten on that bandwagon sooner, when I (kind of) had $$. Oh, well, at least I have these! As you can see, I mostly went for the full nail image plates, because it seemed to fill the gaps left by my fauxnad plates. I'll miss the coupon codes, but I would still order from Kathleen any time with confidence, because the service is top notch!
This is how I store my plates. I got this photo wallet at WalMart, and the plates fit pretty well. It will hold up to 40 plates. Also, both scrapers fit in the back pocket.
So, that's my stamping stash. Now that I have the pics, I will try to remember the individual plates whenever I post a stamping.
I've picked up a few learnings/tips, too, and this seems like a good place to share. Hope these help some fellow n00bs!

  • I only use pure acetone for cleaning plates and accessories. I tried acetone-based remover and it just made a mess and didn't dry like the pure stuff does. 
  • I use a cotton swab for cleaning during the process, then, when I'm all done, I finish cleaning up with a cotton pad for maximum coverage.  
  • I try to line up the plate so the image is how I want it on the nail, making the transfer quick and easy. 
  • I like to stamp over a clear topcoat, since you can then clean a messed-up image right off the nail, with a cotton swab dipped in acetone. The topcoat acts as a buffer, so you won't ruin the base polish underneath. 
  • I use a folded paper towel underneath the plate, so when I pull the scraper across, it just goes off the edge of the plate onto the paper towel.
  • You don't have to cover the entire image on the plate with polish, because the scraper will pull the polish across and fill in any gaps. I usually cover about half the image, and that's plenty. It not only saves a little polish, but it's less messy in the end, too, as there's less excess on your scraper and paper towel.
  • For those who wonder, I don't own a single Konad special polish. I'm sure they're great, but they aren't necessary. Any polish that can be opaque in 1-2 coats is a candidate, or for subtle stamping, it doesn't have to be opaque. All I can say is: Experiment!
  • Regarding topcoat causing the images to streak/run: I've used several topcoats now over stamping, and I've had success with this technique: make sure your image is completely dry, and use more topcoat than you normally would, with as few passes as possible. Really load the brush, and very lightly pass over your nail, so that the brush doesn't even touch the nail, just the bead of topcoat does. 
  • The plates are smaller than you might expect. My storage wallet is made for wallet-sized photos, like school pictures, and the plates are smaller than that lengthwise, but about the same widthwise. All of my plates are roughly 2¼" across (or just under 6cm metric).
  • Get creative! I love layering colors and images, and it always looks fantastic when I do. I still have trouble lining up single images, so layering helps to mask that issue. Happy Emoticons
If anyone has any other tips, feel free to share - I'm always happy to learn new things, and try new techniques!

Thursday, March 18, 2010

Happy St. Patrick's Day!

Here's my St. Patrick's Day mani. Sorry it's late!
Wet n Wild (mystery polish). Celery green creme, 3 coats. This polish is probably at least a decade old, and I have no idea where I got it. It's one of those 'hidden' treasures that I found in a drawer, bought long before my current obsession. The labels you see are the only ones left on the bottle, so since there's no way to know the name, I'm calling it 'ggg', after a well-known OPI polish that I swear this looks just like. (I don't own the OPI, so if anybody has it and can vouch, the second, cooler pic is the most color-accurate on my screen.) It's somewhere between pistachio pudding and green grapes. It kinda gives me lobster claws, but it's so pretty I don't care!
Also, I don't know if it's supposed to do this (like some of the high end square-bottled polishes), but the square cap comes off, for easier handling.
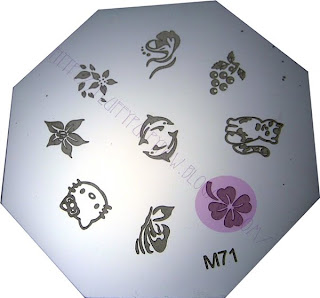
And, here's some clovers! I used Rimmel Camouflage for the darker ones and Pure Ice Free Spirit for the lighter ones. Both of these are gorgeous! I'll have to use each for a full mani some time.
I used this plate for stamping, and it's a no-name fauxnad from evilBay, so the M71 does NOT coincide with Konad M71. I will be posting soon about all the plates I currently own, for reference purposes, so check back if you're curious!

Thursday, March 11, 2010

Moody

I know these are being swatched all over the blogosphere right now, but they're so amazing! So, I might as well throw in my oar and post the one that I got. So much for being unique and different. Oh, well - at least I can be trendy! Happy Smileys
So, on to pictures:
Claire's Mood Wild/Calm. 2 coats with top coat. This is some of the coolest polish ever! It is a gorgeous purple with silver shimmer, that changes to pink when it gets warm. WOW. The effect is very strong and instantaneous. In fact, it was a little tough (and surreal) putting this on, because it would change as I was applying. Especially the second coat, which was purple going over pink, changing to pink as I went. Confused Smileys
This shows how quickly and easily this stuff works: I just covered the tip with my thumb for about 30 seconds, and it went completely pink.
Sorry these two are a bit blurry, but they're action shots! LOL. The first one is after running cold water, and the second after hot water. As you can see, they were already starting to change before I could get the shots. Yep, that's some water droplets on the first one; gives it more of that action feel, right? Happy Smileys
Most of the time, this is what it looks like. My husband will tell you that right around bedtime, my whole nail is dark purple. Just about the time I roll over and put my cold little paws on his nice warm chest. Free Smileys
Thanks for reading!

Saturday, March 6, 2010

Here, There Be Pirates

This post is brought to you by the letter "Arrrrr". Free Emoticons Sorry, I couldn't help it! Let's just get on with the pictures, shall we?
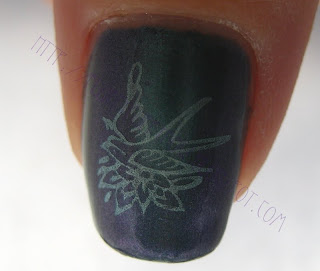
Savina Black Pearl. 2 coats, in artificial light. Gorgeous duochrome! I would say the base is slate blue, and the shimmer flashes from bright teal to bright purple, with every shade in between.
These two were taken in full sunlight, where the slate base was most apparent, but also, no purple! It looked like a completely different polish. I noticed that in different lighting, the character of the polish shifted completely. In some light, it was solid purple, in some, solid teal. It was the neatest effect! I think this is the strongest duochrome polish I own. Love it!
And, since I can't leave even such an awesome polish alone Roll_eye Emoticons I added some stamping to it. In honor of the much-loved pirate movie franchise that includes a ship by the same name (Black Pearl), of course. As you can see, I used China Glaze Metallic Muse for stamping.
As soon as I saw this sparrow stamp, I immediately thought of the tattoo that Johnny Depp has on his forearm. Just Google 'Johnny Depp tattoo', and you should be able to find a pic of the original. Not bad, huh? Also, I really couldn't resist the cupcake and crossbones - isn't that hilarious? This mani is anything but cursed! (*ahem* Sorry. Again. But not really. LOL!)
Thanks for reading!
Evil_Grin EmoticonsEvil_Grin EmoticonsEvil_Grin Emoticons

Monday, March 1, 2010

Ruby Slippers and Valentine FAIL

This was my Valentine's Day mani, sorry if it's a little old and stale. I wasn't sure I would even post it, because the water marble I did was a big, fat FAIL. Anyway, here's the pics of the base color first, because it rocked!
Savvy Ruby Slippers. 3 coats. 2 coats was enough, but I thought an extra coat would add a little more depth. Really pretty burgundy-leaning red jelly base with two sizes of red glitter. Gorgeous! I don't own China Glaze Ruby Pumps yet (I know, sacrilege!), but I think this will keep me happy until I have it. I actually prefer the deeper base this has, I think it suits my skintone very well. All pics are clickable, and I definitely recommend it for these! HAWTNESS!
Here is a shot with flash, so you can see the base color better - it's far from black, which also makes me happy! ☺
FYI, the tip pull/shrinkage you see in these is from Seche Vite - I still haven't mastered how to use this without severe shrinkage. Oh, and for everyone who raves about this topcoat, why hasn't anyone ever mentioned the overpowering reek of this stuff? My husband can smell it from over 10 feet away when I use it, and it almost makes my eyes water! I'm not sure I would have bought it had I known about that. So, you can see I'm not a fan of the legendary Seche Vite, but I have yet to find another thick topcoat that works better for smoothing out even the most gritty glitter polishes, so I may just put up with it for now.
Anyway, on to the fail. (:P) It turned out nothing like I pictured in my head, and I'd like to think some of the blame can go to the polishes I used. At least one of them wasn't behaving, so we'll pretend that's the problem. LOL.
I marbled with the 3 on the left. Then, it looked so bad that I covered it up with Orly Prisma Gloss Gold. I know, I know - I should have just left it alone, right? It just made things worse. Oh, well, here's 2 pics. ugh. Don't say I didn't warn you.
My thumb almost turned out, see? *insert maniacal laughter* This lasted all of a day. I just couldn't stand it! Way to ruin a perfectly good red glitter polish, huh?
Thanks for reading!